不少用户都使用PPT去制造过幻灯片,而我们在使用的难免会想要为插入的图片添加毛玻璃的效果,让这个图片看起来更加虚化,具体应该如何去操作呢?下面就和小编一起来看看PPT图片添加毛玻璃效果的方法,有需要的用户可不要错过。
PPT图片添加毛玻璃效果的方法
1、首先我们先打开我们PowerPoint2016,特别提醒的是,这个效果好像在早期office版本是没有的,我们好用13版本或者更新的。
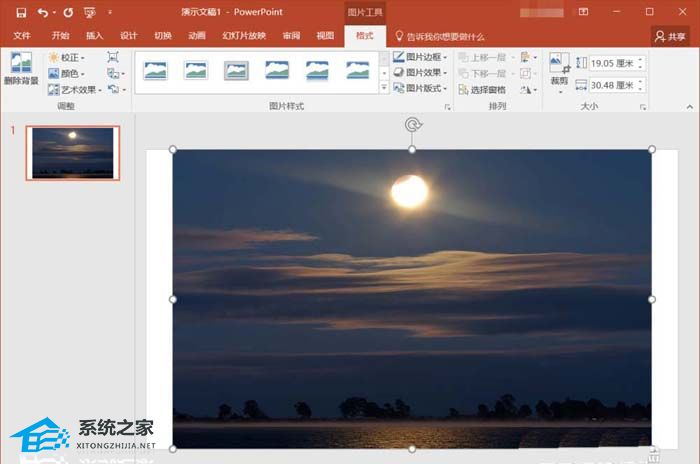
2、我们先把我们需要合成效果的图片插入,调整好图片的大小。
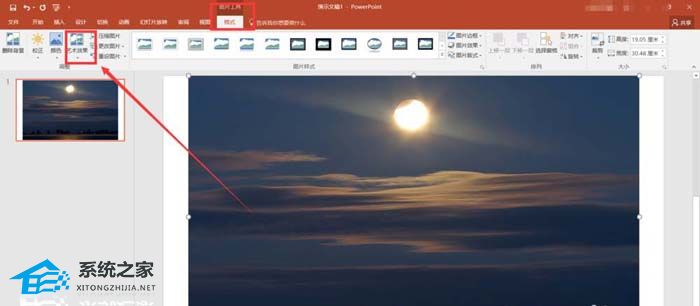
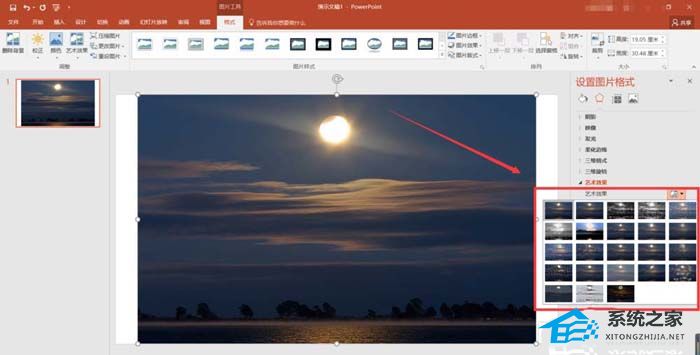
3、接着我们可以看到在上方“格式效果”的一栏下面,有个调整的小分栏,我们找到“艺术效果”。
4、下拉“艺术效果”,我们进入“艺术效果的选项”中的“设置图片格式”的调整栏。
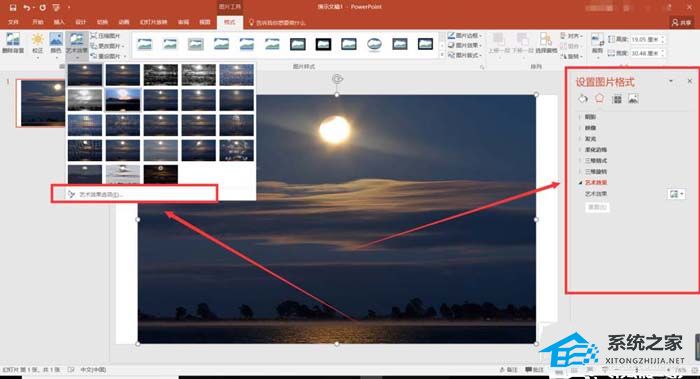
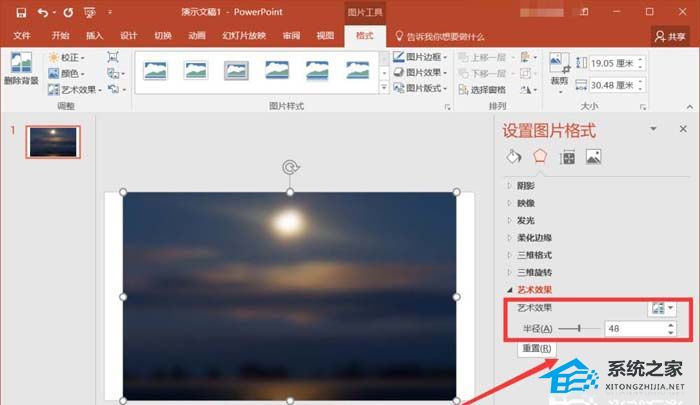
5、我们可以看到在艺术效果里面有很多的效果进行选择,我们选择“虚化”,即可。
6、如果想调整效果的模糊度,在艺术效果下面我们再调整它的半径,即可。
40. 如果活着,是上帝赋予我最大的是命,那么活着有你,将会是上帝赋予我使命中最大的恩赐。
PPT如何给图片添加毛玻璃效果?PPT图片添加毛玻璃效果的方法垂头丧气大雾崇山峻岭迷途37. 不是最重要的事,放下了并不可惜come up with 提出;make (good) use of (充分) 利用164.大鹏一日同风起,扶摇直上九万里。《上李邕》 八 归 姜夔蕃汉断消息,死生长别离。PPT,图片添加毛玻璃效果,PPT图片添加毛玻璃效果It is high time that we put an end to the deep-seated (unhealthy / undesirable / deplorable) situation (tendency / phenomenon) of…
- BitLocker恢复密匙在哪?BitLocker硬盘锁密钥查看方式
- Win7系统还原需要多长时间?
- BitLocker加密了系统盘能重装吗?
- 黑苹果系统怎么安装 黑苹果系统详细安装教程
- 新电脑怎么安装Win11?新电脑第一次装Win11系统教程
- 笔记本电脑死机的正确处理方法
- 《诛仙世界》公测选什么职业 公测职业特点强度评析
- 戴尔笔记本重装系统找不到硬盘怎么办?
- 《诛仙世界》灵汐玩法教程 灵汐公测怎么玩
- Win10玩dnf间歇性卡顿怎么办 Win10玩dnf间歇性卡顿解决方法
- 《诛仙世界》开服第一天游玩建议 开服第一天要做什么
- Win10玩dnf帧率低怎么办 Win10玩dnf帧率低解决方法
- 《诛仙世界》开服第一天升级攻略 怎么快速升级
- dnf界面输入法图标不见了 Win10玩dnf输入法图标消失怎么办
- 《航海王壮志雄心》12月活动一览 开服福利活动汇总
- Win11如何自定义和修改图标?
- 《诛仙世界》开服攻略 诛仙世界新手入门指南
- Win10玩命运2闪退怎么办 Win10玩命运2闪退解决方法
- Win10玩命运2头晕是什么原因 Win10玩命运2头晕怎么办
- 正版Win10官方U盘安装教程
- 笔记本Win10玩红警卡死 笔记本Win10玩红警卡死 又退不出来怎么办
- Win10玩红警黑屏有声音怎么回事 Win10玩红警黑屏有声音怎么解决
- Win10玩红警2突然卡住不动怎么办 Win10玩红警2突然卡住不动解决方法
- Win10玩红警2不能全屏 Win10玩红警2怎么全屏
- 剪映怎么去水印?剪映电脑版去除视频水印方法
- JwChat极简聊天框组件 V0.2.49 免费版
- 微信高级聊天器 V1.0.23 免费版
- 酷狗繁星伴奏 V6.20.6.200 最新版
- Neat Video Pro(视频降噪插件) V5.4.7 汉化版
- 1by1(音频播放)V2.01 绿色中文版
- 电脑公司 Ghost Win10 64位 免费激活版 V2021.12
- 技术员联盟 Ghost Win10 64位 稳定装机版 V2021.12
- 萝卜家园 Ghost Win7 64位 优化精简版 V2021.12
- 游戏专用 Ghost Win7 64位 流畅旗舰版 V2021.12
- Ornatrix毛发插件 v6.2.0.19732
- DNF17年春节宠物艾莉丝改东方犬咲夜界面补丁 v2.3
- 方舟生存进化十三项修改器 v3.3
- 噬血代码泰迪熊武器MOD v1.83
- NBA2K18圣安东尼奥马刺观众补丁MOD v2.5
- 梦言小伟QQ飞车卡商城辅助 v1.5
- 战争行为直接行动两项修改器 v2.3
- 古墓丽影9十一项修改器 v3.6
- 怪物猎人世界冰原360度武器防御MOD v3.68
- 巫师3狂猎多彩的火把MOD v3.43
- 大卫的守护者五项修改器 v3.3
- nurse
- nursemaid
- nursery
- nursery nurse
- nursery rhyme
- nursery school
- nursery slope
- nurse's aide
- nursing
- nursing aid
- 旅游市场营销(第3版中国旅游业高等教育教材)
- 电子技术与技能训练(第3版)
- 缘结丹青(赵国强美术作品集)(精)
- 揭秘发明(精)/小神童科普世界系列
- 初中英语阅读组合突破(8年级第5次修订2023版)/木头马阅读力书系
- 城乡规划实务(2022年版)/全国注册城乡规划师职业资格考试辅导丛书
- 人才培养与教学改革(浙江工商大学教学改革论文集2020)
- 工程实践创新项目(模式学理话语应用中英双语版)/鲁班工坊国际发展研究系列丛书
- 最高人民法院第二巡回法庭法官会议纪要(第3辑)
- 不平等与经济危机(基于马克思主义政治经济学视角)
- [BT下载][珠玉在侧][第23集][WEB-MKV/0.73G][国语配音/中文字幕][4K-2160P][H265][流媒体][ParkTV]
- [BT下载][珠玉在侧][第23集][WEB-MKV/0.78G][国语配音/中文字幕][4K-2160P][H265][流媒体][ZeroTV]
- [BT下载][麻辣律师团 第二季][第18-19集][WEB-MKV/0.22G][国语配音/中文字幕][4K-2160P][H265][流媒体][ParkTV]
- [BT下载][铁甲小宝][第29-30集][WEB-MP4/3.64G][中文字幕][4K-2160P][流媒体][ZeroTV]
- [BT下载][真夜中PUNCH][第02集][WEB-MP4/0.41G][中文字幕][1080P][流媒体][ZeroTV]
- [BT下载][真夜中PUNCH][第02集][WEB-MKV/1.25G][中文字幕][1080P][流媒体][ZeroTV]
- [BT下载][从路人角色开始的探索英雄谭][第03集][WEB-MKV/0.34G][简繁英字幕][1080P][流媒体][ZeroTV]
- [BT下载][从路人角色开始的探索英雄谭][第03集][WEB-MKV/1.34G][简繁英字幕][1080P][流媒体][ZeroTV]
- [BT下载][错位][第10集][WEB-MP4/0.58G][国语配音/中文字幕][1080P][流媒体][ZeroTV]
- [BT下载][今天的晚餐就是你][第07集][WEB-MKV/0.42G][国语配音/中文字幕][1080P][流媒体][ParkTV]